Reference
Fascial lines, muscle imbalance, trigger points, acupressure, and movement practices.
Fascial Lines (Anatomy Trains)
Fascia is not merely a wrapping material — it forms continuous tensional lines that run the full length of the body. Thomas Myers' Anatomy Trains maps these lines, showing how restriction in one region creates compensatory tension throughout an entire fascial chain. This explains why releasing the feet can ease neck tension, or why glute work resolves shoulder pain.
.png)
.png)
.png)
.png)
.png)
When a local release doesn't seem to hold, follow the fascial line. If the neck is tight, check the plantar fascia (Superficial Back Line). If one shoulder is elevated, check the same-side IT band (Lateral Line). Effective structural bodywork works with these continuities — not against them.
Muscle Imbalance Syndromes
Vladimir Janda identified predictable patterns of muscle imbalance — certain muscles become chronically tight and shortened (tonic/facilitated), while others become lengthened and inhibited (phasic). These create the "crossed syndrome" patterns that drive most postural dysfunction. Releasing tight muscles without activating inhibited ones produces only temporary relief.
.png)
.png)
.png)
Common Trigger Points
A NeuroMuscular Trigger Point (NMT) is a hyperirritable spot within a muscle that, when compressed, refers pain or sensation to a distant location. The referred location is predictable — each muscle has its own consistent referral pattern. Sustained, slow pressure on an active trigger point will eventually cause the referral pattern to diminish and the muscle to release.
Understanding Neuromuscular Trigger Points (NMTs)
A NeuroMuscular Trigger Point is a hyperirritable nodule within a taut band of skeletal muscle. What distinguishes an NMT from ordinary muscle soreness is its hallmark feature: referred pain. When compressed, an active NMT sends pain signals to a predictable location elsewhere in the body — often far from the trigger point itself. This referred pain pattern is the primary diagnostic indicator of a true NMT.
For example, a trigger point in the lateral head of the gastrocnemius behind the knee can refer pain into the arch of the foot. A trigger point in the lower rhomboid can send shooting pain down the arm and into the hand. These patterns are not random — they follow consistent neurological pathways mapped in detail by Janet Travell and David Simons over decades of clinical research, culminating in their landmark Myofascial Pain and Dysfunction: The Trigger Point Manual.
The St. John Method — Five Sources of Pain
Paul St. John developed his Neuromuscular Therapy method around five identifiable sources of soft tissue pain. His charting system evaluates each source systematically to trace pain back to its root cause rather than simply treating the site of the symptom.
-
1
Ischemia
Lack of blood supply to soft tissues, causing extreme touch sensitivity. Tissue that is tender at under 5–10 pounds of pressure is ischemic. Tight muscles and trigger point activity are the most common causes — the sustained contraction compresses local capillaries, starving the tissue of oxygen and allowing metabolic waste to accumulate.
-
2
Trigger Points
Hyperirritable spots firing rapid nerve impulses into distant referral zones. The real cause of pain is often far from the pain site. TPs also inhibit local blood flow, creating a self-reinforcing ischemia–pain cycle: ischemia activates TPs, and TPs worsen ischemia.
-
3
Nerve Compression / Entrapment
Pressure on a nerve by bone, cartilage, or hypertonic soft tissue. As tissues tighten around nerve pathways, nerves get strangled against hard structures, producing radiating pain, numbness, or tingling along the nerve's distribution. Common sites include the piriformis compressing the sciatic nerve, the scalenes compressing the brachial plexus, and the carpal tunnel compressing the median nerve.
-
4
Postural Distortion
Structural imbalance measured on the coronal, sagittal, and horizontal planes. Deviation from neutral alignment creates asymmetrical loading and compensatory tension patterns throughout the kinetic chain — feeding all four other pain sources. Postural distortion is often the upstream cause that makes the others chronic.
-
5
Biomechanical Dysfunction
Faulty movement patterns arising from postural distortion, prior injury, or ingrained habit. Dysfunctional movement creates repetitive microtrauma with every step, lift, or reach — accelerating trigger point formation and preventing tissues from fully recovering between loading cycles.
In the St. John assessment, the therapist evaluates posture on all three anatomical planes, screens gait for asymmetry and compensation, then systematically palpates for ischemia, trigger points, and nerve compression. Treatment uses sustained pressure of 8–12 seconds per point at moderate discomfort — enough to stimulate a neurological response without triggering protective guarding. The five-source framework is what makes NMT effective for chronic pain: rather than chasing the pain site, the therapist traces the chain from referred pain back through trigger points, ischemia, nerve involvement, and the postural or biomechanical root cause driving the entire pattern.
Active vs. Latent Trigger Points
Active trigger points refer pain spontaneously or on compression, and are the primary source of a client's chief complaint. They are tender to touch, cause the characteristic referred pain pattern, and often produce a local twitch response when pressed firmly. Latent trigger points do not refer pain on their own but are tender on direct compression and restrict range of motion. Latent TPs can become active with overuse, stress, poor posture, or chilling of the muscle. Most adults carry many latent TPs without realizing it — until they are palpated.
Satellite Trigger Points
A satellite trigger point develops in the referred pain zone of another trigger point — the primary TP. For instance, a QL trigger point commonly sends referred pain into the gluteus medius, where a satellite TP then forms. Treating only the satellite (the site of pain) without addressing the primary TP produces temporary relief at best. This cascading pattern explains why pain seems to "move around" or why treating a painful area fails to resolve it.
How Trigger Points Form
The most accepted model proposes that TPs arise from dysfunctional motor end plates — the junctions where a motor nerve contacts a muscle fiber. An excessive release of acetylcholine causes a sustained contraction of a small group of sarcomeres, creating a taut band. This local contraction reduces circulation, decreases oxygen and nutrients, and increases metabolic waste products. The resulting chemical environment sensitizes nociceptors and creates the hyperirritable nodule. Common causes include acute trauma, repetitive microtrauma, sustained postures, emotional stress, and nutritional deficiencies (especially B vitamins, Vitamin D, and iron).
When a client says "I know this is coming from somewhere else, I just don't know where" — they are probably correct. Referred pain from trigger points is often described as deep, diffuse, and dull, in contrast to the sharp local pain at the trigger point site itself. If pressing on a spot reproduces a pain pattern the client recognizes — especially in a different location — you have found an active trigger point.
Finding and Treating Trigger Points
The primary assessment technique is flat palpation (pressing the muscle against an underlying bone) or pincer palpation (grasping the muscle between thumb and fingers and rolling it). You are looking for a taut band — a cord-like thickening in the muscle belly — and within it, a hypersensitive nodule that reproduces your client's familiar pain pattern. A local twitch response — a brief, visible or palpable contraction of the taut band when you strum across it — confirms you have found a trigger point.
Core Trigger Point Reference Table
| Muscle / Site | Location | Referral Pattern |
|---|---|---|
| Lower Rhomboid | 1–2 inches medial to inferior scapula angle | Neck, upper back, arms, head |
| Teres Minor | Posterior shoulder, inferior to the scapula spine | Arm (especially the hand) |
| Sternocleidomastoid (SCM) | Along the neck from sternum/clavicle to behind ear | Neck, head, headaches, sinus pain, eye pain |
| Quadratus Lumborum (QL) | Deep, lateral to lumbar spine | Low back, hip, SI joint, buttock |
| Piriformis / Deep 6 | Posterior hip, from sacrum to femur | Buttock, posterior thigh (mimics sciatica) |
| Levator Scapulae | Neck, superior medial scapula border | Neck stiffness, upper trapezius |
Trigger Points by Region
The following tables expand the reference to cover the most clinically significant trigger points organized by body region. Use these to trace the source of a complaint that isn't responding to local treatment.
Head, Neck & Jaw
| Muscle / Site | Location | Referral Pattern |
|---|---|---|
| Upper Trapezius | Superior angle of the trapezius, along the neck-shoulder curve | Back of the head, temporal headache, behind the eye, jaw |
| Suboccipitals | Base of skull, between occiput and C1/C2 | Band-like headache from base of skull around to forehead and eye; often described as "inside the head" |
| Scalenes (Anterior / Middle) | Lateral neck, either side of the SCM | Chest, anterior shoulder, radial forearm, thumb and index finger — commonly mimics thoracic outlet syndrome |
| Masseter | Chewing muscle over the mandible | Upper and lower molars, ear, jaw — common source of TMJ dysfunction and tooth pain |
| Temporalis | Temple, fan-shaped muscle from cheekbone to temporal fossa | Temporal headache, upper teeth, eye pain, hypersensitive teeth |
Shoulder, Chest & Arm
| Muscle / Site | Location | Referral Pattern |
|---|---|---|
| Infraspinatus | Scapular fossa, below the spine of the scapula | Anterior shoulder, upper arm, radial forearm, and hand — often misdiagnosed as rotator cuff tear or biceps tendinitis |
| Subscapularis | Anterior surface of the scapula (accessible at the axillary border) | Posterior shoulder, posterior upper arm, wrist band pattern |
| Pectoralis Minor | Deep to pectoralis major, ribs 3–5 to coracoid process | Anterior chest, medial arm and forearm, ulnar fingers — can mimic cardiac pain and thoracic outlet syndrome |
| Pectoralis Major | Sternal and clavicular heads of the chest | Anterior chest, medial arm, breast tissue — sternal head may refer into cardiac region |
| Biceps Brachii | Belly of the biceps, anterior upper arm | Anterior shoulder and upper arm; deep ache at the deltoid insertion |
| Triceps | Posterior upper arm, especially long head near the axilla | Posterior forearm, ring and little finger, lateral epicondyle (mimics tennis elbow) |
Back & Core
| Muscle / Site | Location | Referral Pattern |
|---|---|---|
| Iliocostalis / Erector Spinae | Lateral to the thoracic or lumbar spine | Thoracic TPs refer anteriorly to the abdomen; lumbar TPs refer to the SI joint, buttock, and abdomen |
| Multifidi / Rotatores | Deep to the erectors, in the grooves between spinous and transverse processes | Spinous process region; localized deep spinal pain; can intensify with flexion or extension |
| Serratus Posterior Inferior | Lower thoracic region, deep to the latissimus | Deep aching in the low thoracic region, often described as a "stitch" or "catch" in the side |
| Iliopsoas | Accessible at the lower abdomen or inguinal area; deep posterior hip | Anterior thigh, low back (ipsilateral vertical band), groin — significantly contributes to lumbar lordosis and anterior pelvic tilt when shortened |
Hip, Pelvis & Thigh
| Muscle / Site | Location | Referral Pattern |
|---|---|---|
| Gluteus Medius | Lateral iliac crest, between the ASIS and the PSIS | SI joint, posterior hip, lateral buttock, lateral thigh — one of the most common sources of "low back pain" and SI dysfunction |
| Gluteus Minimus | Deep to glute medius, posterior lateral hip | Full lateral thigh, into the calf and ankle — closely mimics L5/S1 radiculopathy and sciatica |
| TFL / IT Band | Lateral thigh, from ASIS to the lateral knee | Lateral thigh and knee — often the source of lateral knee pain and IT band syndrome |
| Vastus Lateralis | Lateral quadricep, along the lateral thigh | Lateral thigh and lateral knee; can restrict knee flexion significantly |
| Adductors (Magnus / Longus) | Inner thigh, from the pubic ramus to the medial femur and tibia | Medial thigh, groin, inner knee — adductor magnus refers deeply into the pelvis and can contribute to pelvic floor dysfunction |
| Hamstrings | Posterior thigh — biceps femoris, semimembranosus, semitendinosus | Posterior thigh and knee; proximal attachment TPs near the ischial tuberosity refer deeply into the buttock |
Lower Leg & Foot
| Muscle / Site | Location | Referral Pattern |
|---|---|---|
| Gastrocnemius (Lateral Head) | Behind the knee, lateral to the popliteal fossa | Arch of the foot — a classic example of distal referral; often the true source of plantar foot pain |
| Soleus | Deep to the gastrocnemius, accessible along the medial and lateral borders of the calf | Heel, Achilles region, plantar heel — frequently the unrecognized source of Achilles tendinopathy and heel pain |
| Tibialis Anterior | Lateral to the shin bone, upper two-thirds of the tibia | Anterior ankle, dorsum of the foot, great toe — refers along the path of the muscle's tendon |
| Peroneals (Longus / Brevis) | Lateral lower leg, along the fibula | Lateral ankle, lateral heel — contributes to lateral ankle instability patterns and chronic ankle sprains |
| Flexor Digitorum Brevis | Plantar surface of the foot, central arch | Plantar forefoot, across the metatarsal heads — a local contributor to ball-of-foot pain and Morton's neuroma-like symptoms |
Self-Treatment Protocol
The following sequence can be applied to any active trigger point using a ball, thumb, or tool. The goal is not to crush the point into submission but to create a therapeutic dialogue with the nervous system — enough sustained pressure to initiate a neurological release.
Step 1 — Locate
Use flat or pincer palpation to find the taut band. Move slowly — the muscle will "speak" when you pass over an active nodule. Ask whether the pressure reproduces a familiar symptom, even if it's in a different location. That recognition confirms an active trigger point.
Step 2 — Compress
Apply steady, slow pressure into the nodule — not aggressive force, but confident presence. A pressure level of 5–7 out of 10 is appropriate: uncomfortable but tolerable. Maintain this pressure without moving. The referral pattern will often intensify in the first 10–20 seconds, then begin to fade as the motor end plate calms.
Step 3 — Breathe & Wait
Breathe slowly and deeply while maintaining pressure. Many clients instinctively hold their breath against pain — this prevents release. Direct attention to expanding the belly and back with each inhale. The characteristic sign of a successful release is the referral pattern diminishing or disappearing entirely, often accompanied by a wave of warmth in the area. This may take 30 seconds to several minutes.
Step 4 — Lengthen
After the point releases, gently lengthen the muscle through its full range of motion. Do not aggressively stretch — simply take it to the end of comfortable range and breathe there. This teaches the nervous system the new, relaxed length of the muscle and helps prevent the trigger point from reactivating.
Step 5 — Hydrate & Move
Trigger point work mobilizes metabolic waste products from the compressed tissue. Drink water after a session, and do gentle movement to help circulation distribute the released tension through the rest of the system. Avoid vigorous exercise of the treated area for 24–48 hours after intensive trigger point work.
Identify the tender spot. Apply sustained, slow pressure — not more force, but more presence. The referral pattern will often intensify initially, then diminish as the point releases. This may take 30 seconds to several minutes. Breathe into the sensation rather than tensing against it.
If a trigger point keeps returning within days of treatment, look upstream. Check for a primary TP whose referral zone overlaps the point you are treating — it may be a satellite. Also consider perpetuating factors: nutritional deficiencies (B12, Vitamin D, iron), chronic mechanical stress from poor workstation ergonomics, short leg syndrome, or habitual movement patterns. Trigger point therapy resolves the nodule; removing the perpetuating factor prevents it from returning.
Key Acupressure Points
Acupressure points (acu-points) are specific locations on the body used in Traditional Chinese Medicine and many structural bodywork modalities. Sustained pressure on these points can modulate pain, energy, and specific organ systems.
| Point | Location | Primary Use |
|---|---|---|
| Stomach 36 (ST36) | 4 finger-widths below the knee, 1 finger-width lateral to the shin | General vitality, digestion, immune support, fatigue |
| Lung 6 (LU6) | Midpoint of the forearm on the radial (thumb) side | General pain relief, acute pain anywhere in the body |

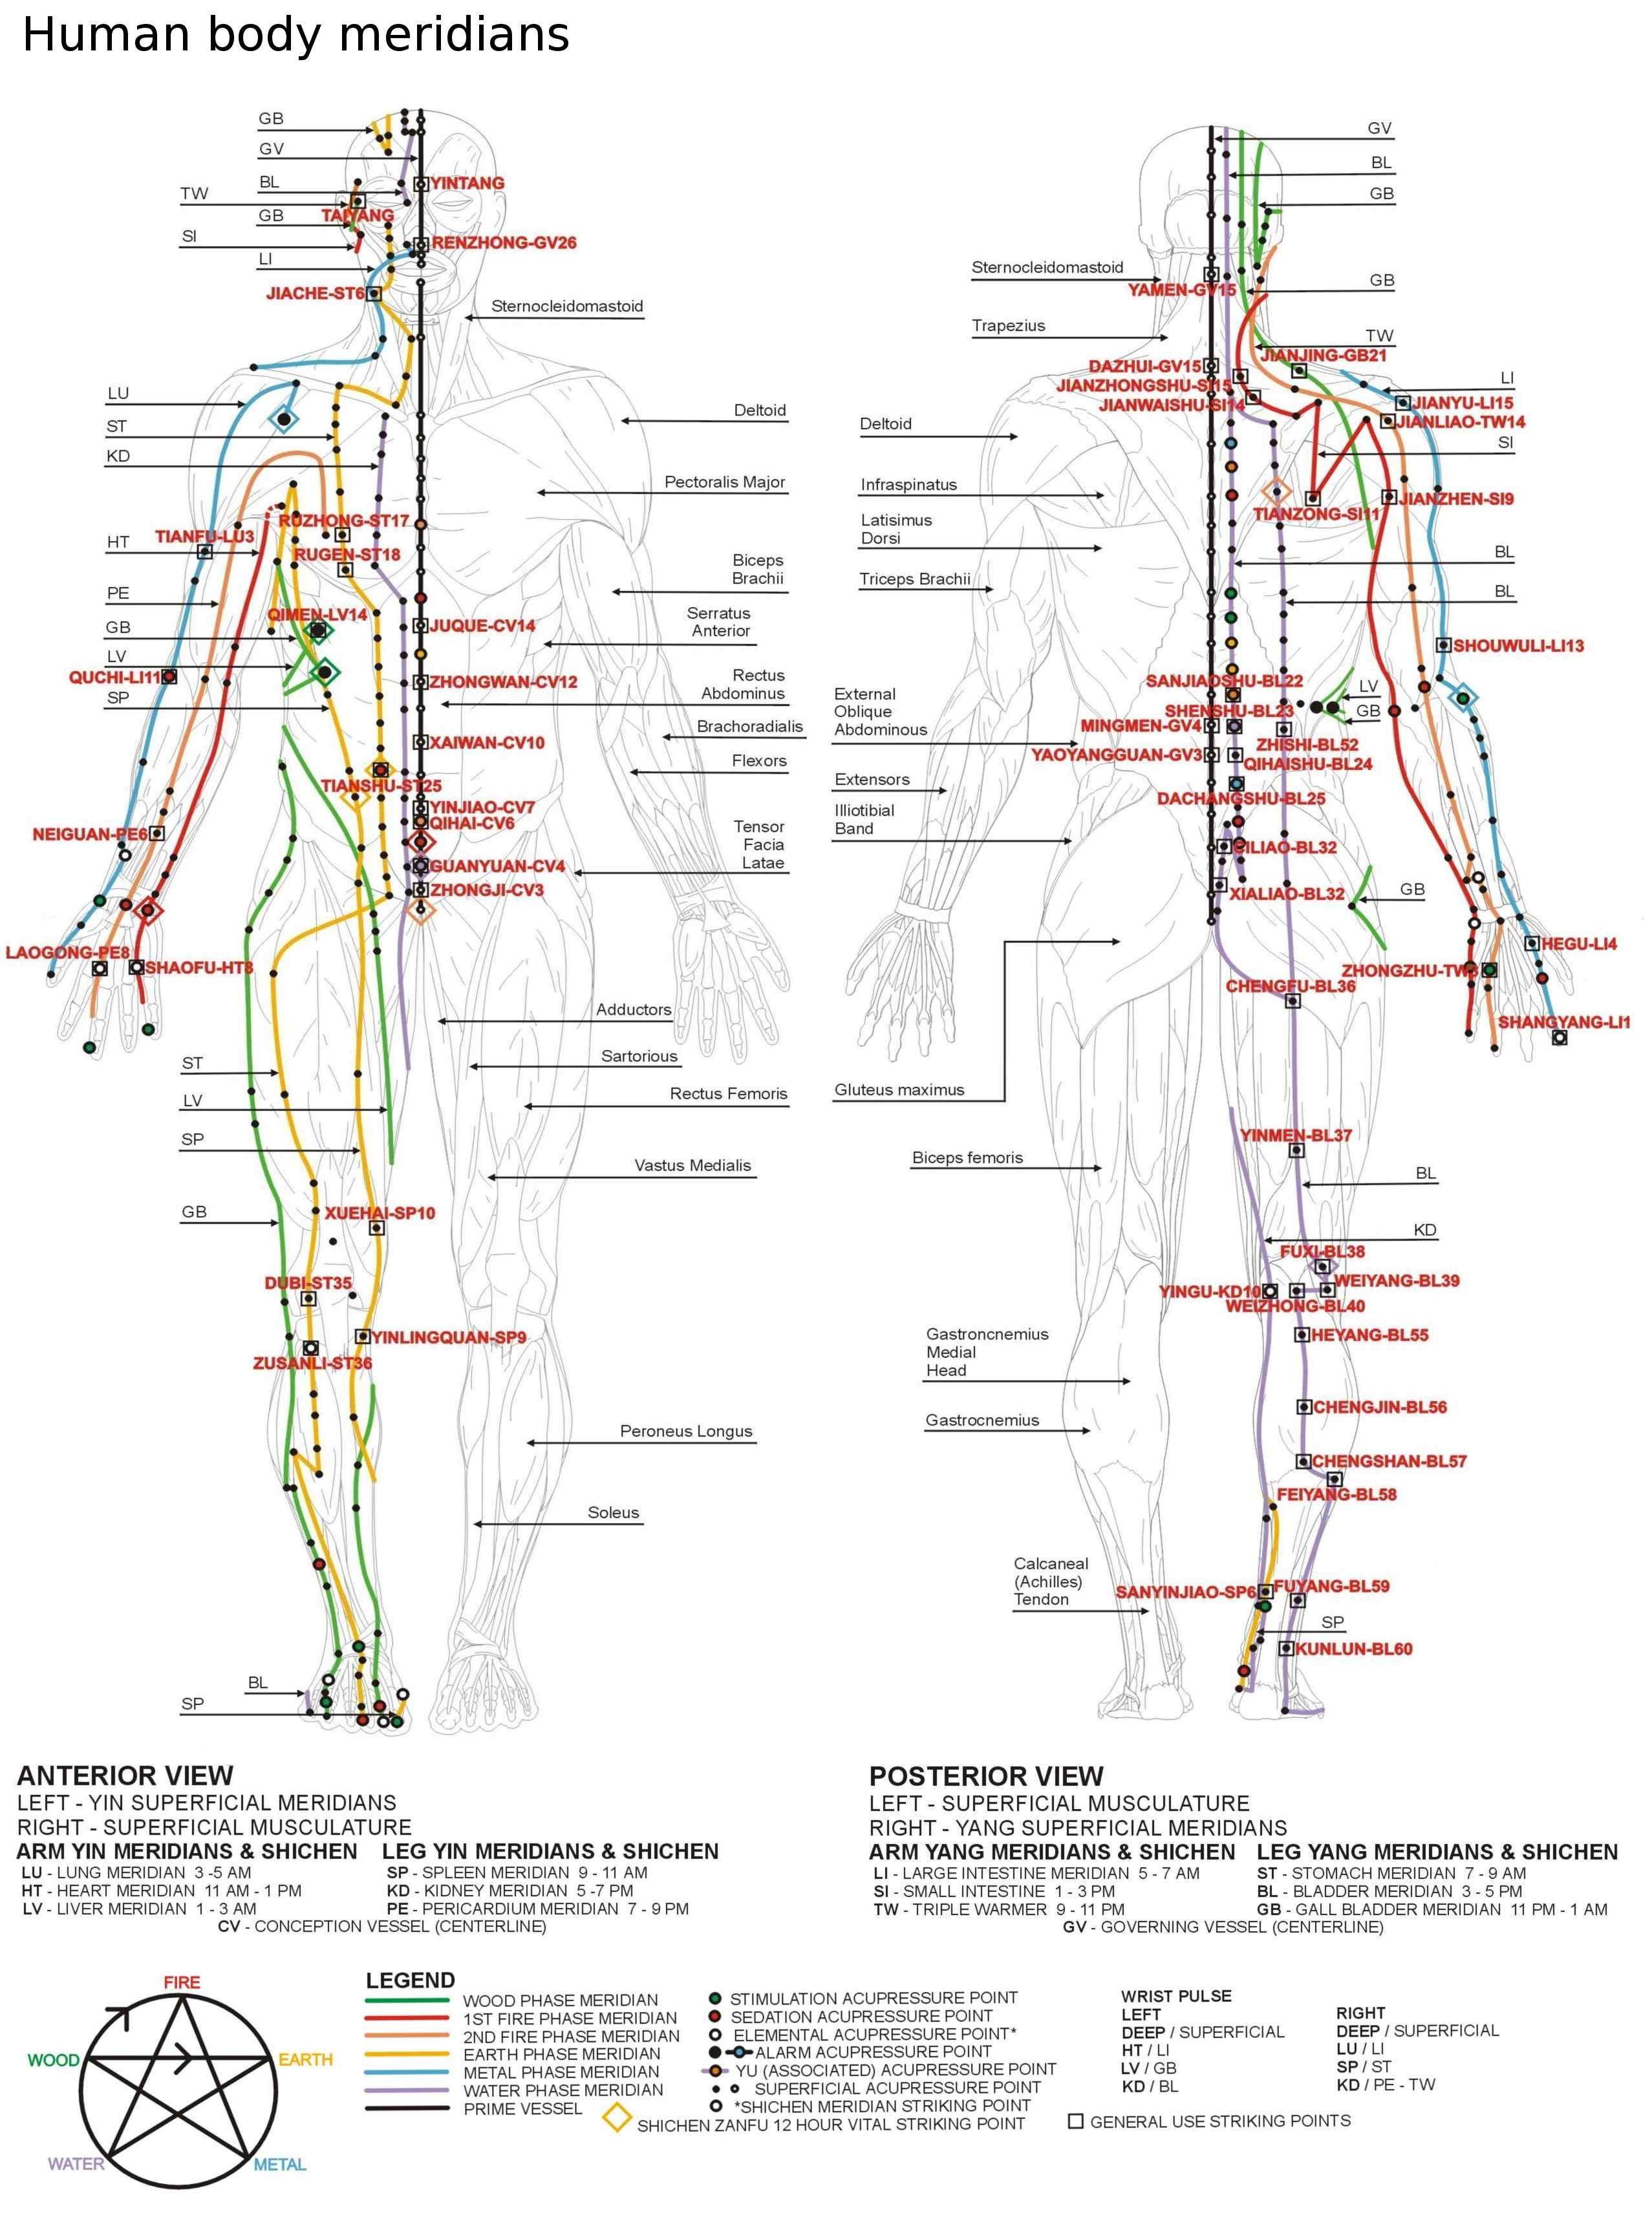
Meridian Reference Chart
The following chart shows the major meridian pathways of Traditional Chinese Medicine — anterior and posterior views — with key acupressure and striking points labeled. Meridians represent functional channels through which qi (vital energy) flows, each associated with specific organ systems and active at specific times of day.
Movement Practices
The following movement practices complement and reinforce the manual release work. They help integrate the new space you create, build awareness of your body's alignment, and develop the breath connection necessary for lasting change.
Tai Chi (Tai Ji Quan)
Knee Circling
Fluid circles of the knee joint warm up the joint capsule and encourage synovial fluid distribution throughout the meniscus and cartilage.
Feeding the Dragon
A wave-like spinal movement that coordinates hip, thoracic, and cervical rotation. Develops awareness of the leg column and its relationship to the thorax.
Turning the Wheel
Large circular arm movements that open the shoulder girdle and develop coordination between the arms and the thoracic spine.
Stroking the Beard
Gentle attention to the neck and anterior cervical muscles, developing awareness of the head-neck relationship and counteracting forward head posture.
Reeling Silk
A fundamental Tai Chi concept — fluid, spiraling movement that begins from the center (dan tian) and unwinds outward through the limbs. Develops fascial continuity.
Qi Gong
Balloon Breathing
Lying on your back, focus on breathing three-dimensionally — expanding into the low back, sides, and belly simultaneously. Start with awareness at the LDH (T12 area). This mobilizes the thoracic and lumbar spine from the inside.
Forward Bend & Bouncing
Standing forward bend with soft knees. Allow the head to hang heavy. Gentle bouncing lets gravity tractit the spine. Visualize a column of light running down the center of each vertebra.
Point of Expansion
A body-awareness practice identifying the point in the body from which all movement originates and expands outward. Related to the dan tian (lower abdomen energy center). Develops the connection between breath, core, and limb movement.
Bodywave / BreathWave
A spinal undulation that begins with the pelvic tilt and travels in a wave up through the lumbar, thoracic, and cervical spine. Coordinates breath with movement. The most foundational integrative practice for all the work in this manual.
Structural Stretches
These floor-based stretches explore how the psoas functions and how movement transmits from the LDH through the pelvis to the feet. Allow time for cycles of breathing and discharge — the ANS releases can come up as spontaneous deep breathing, sighing, or yawning, especially when the back of the diaphragm is stimulated.
.png)
.png)
.JPG)
The more you practice these movement forms after doing manual release work, the more quickly the new tissue organization integrates into your nervous system. Your brain learns spatial awareness through movement — the manual work opens the space, and movement teaches your body to inhabit it.