Core & Spine
Pelvis, glutes, low back, the lumbodorsal hinge, upper back, and rib cage.
Pelvis, Glutes & Core
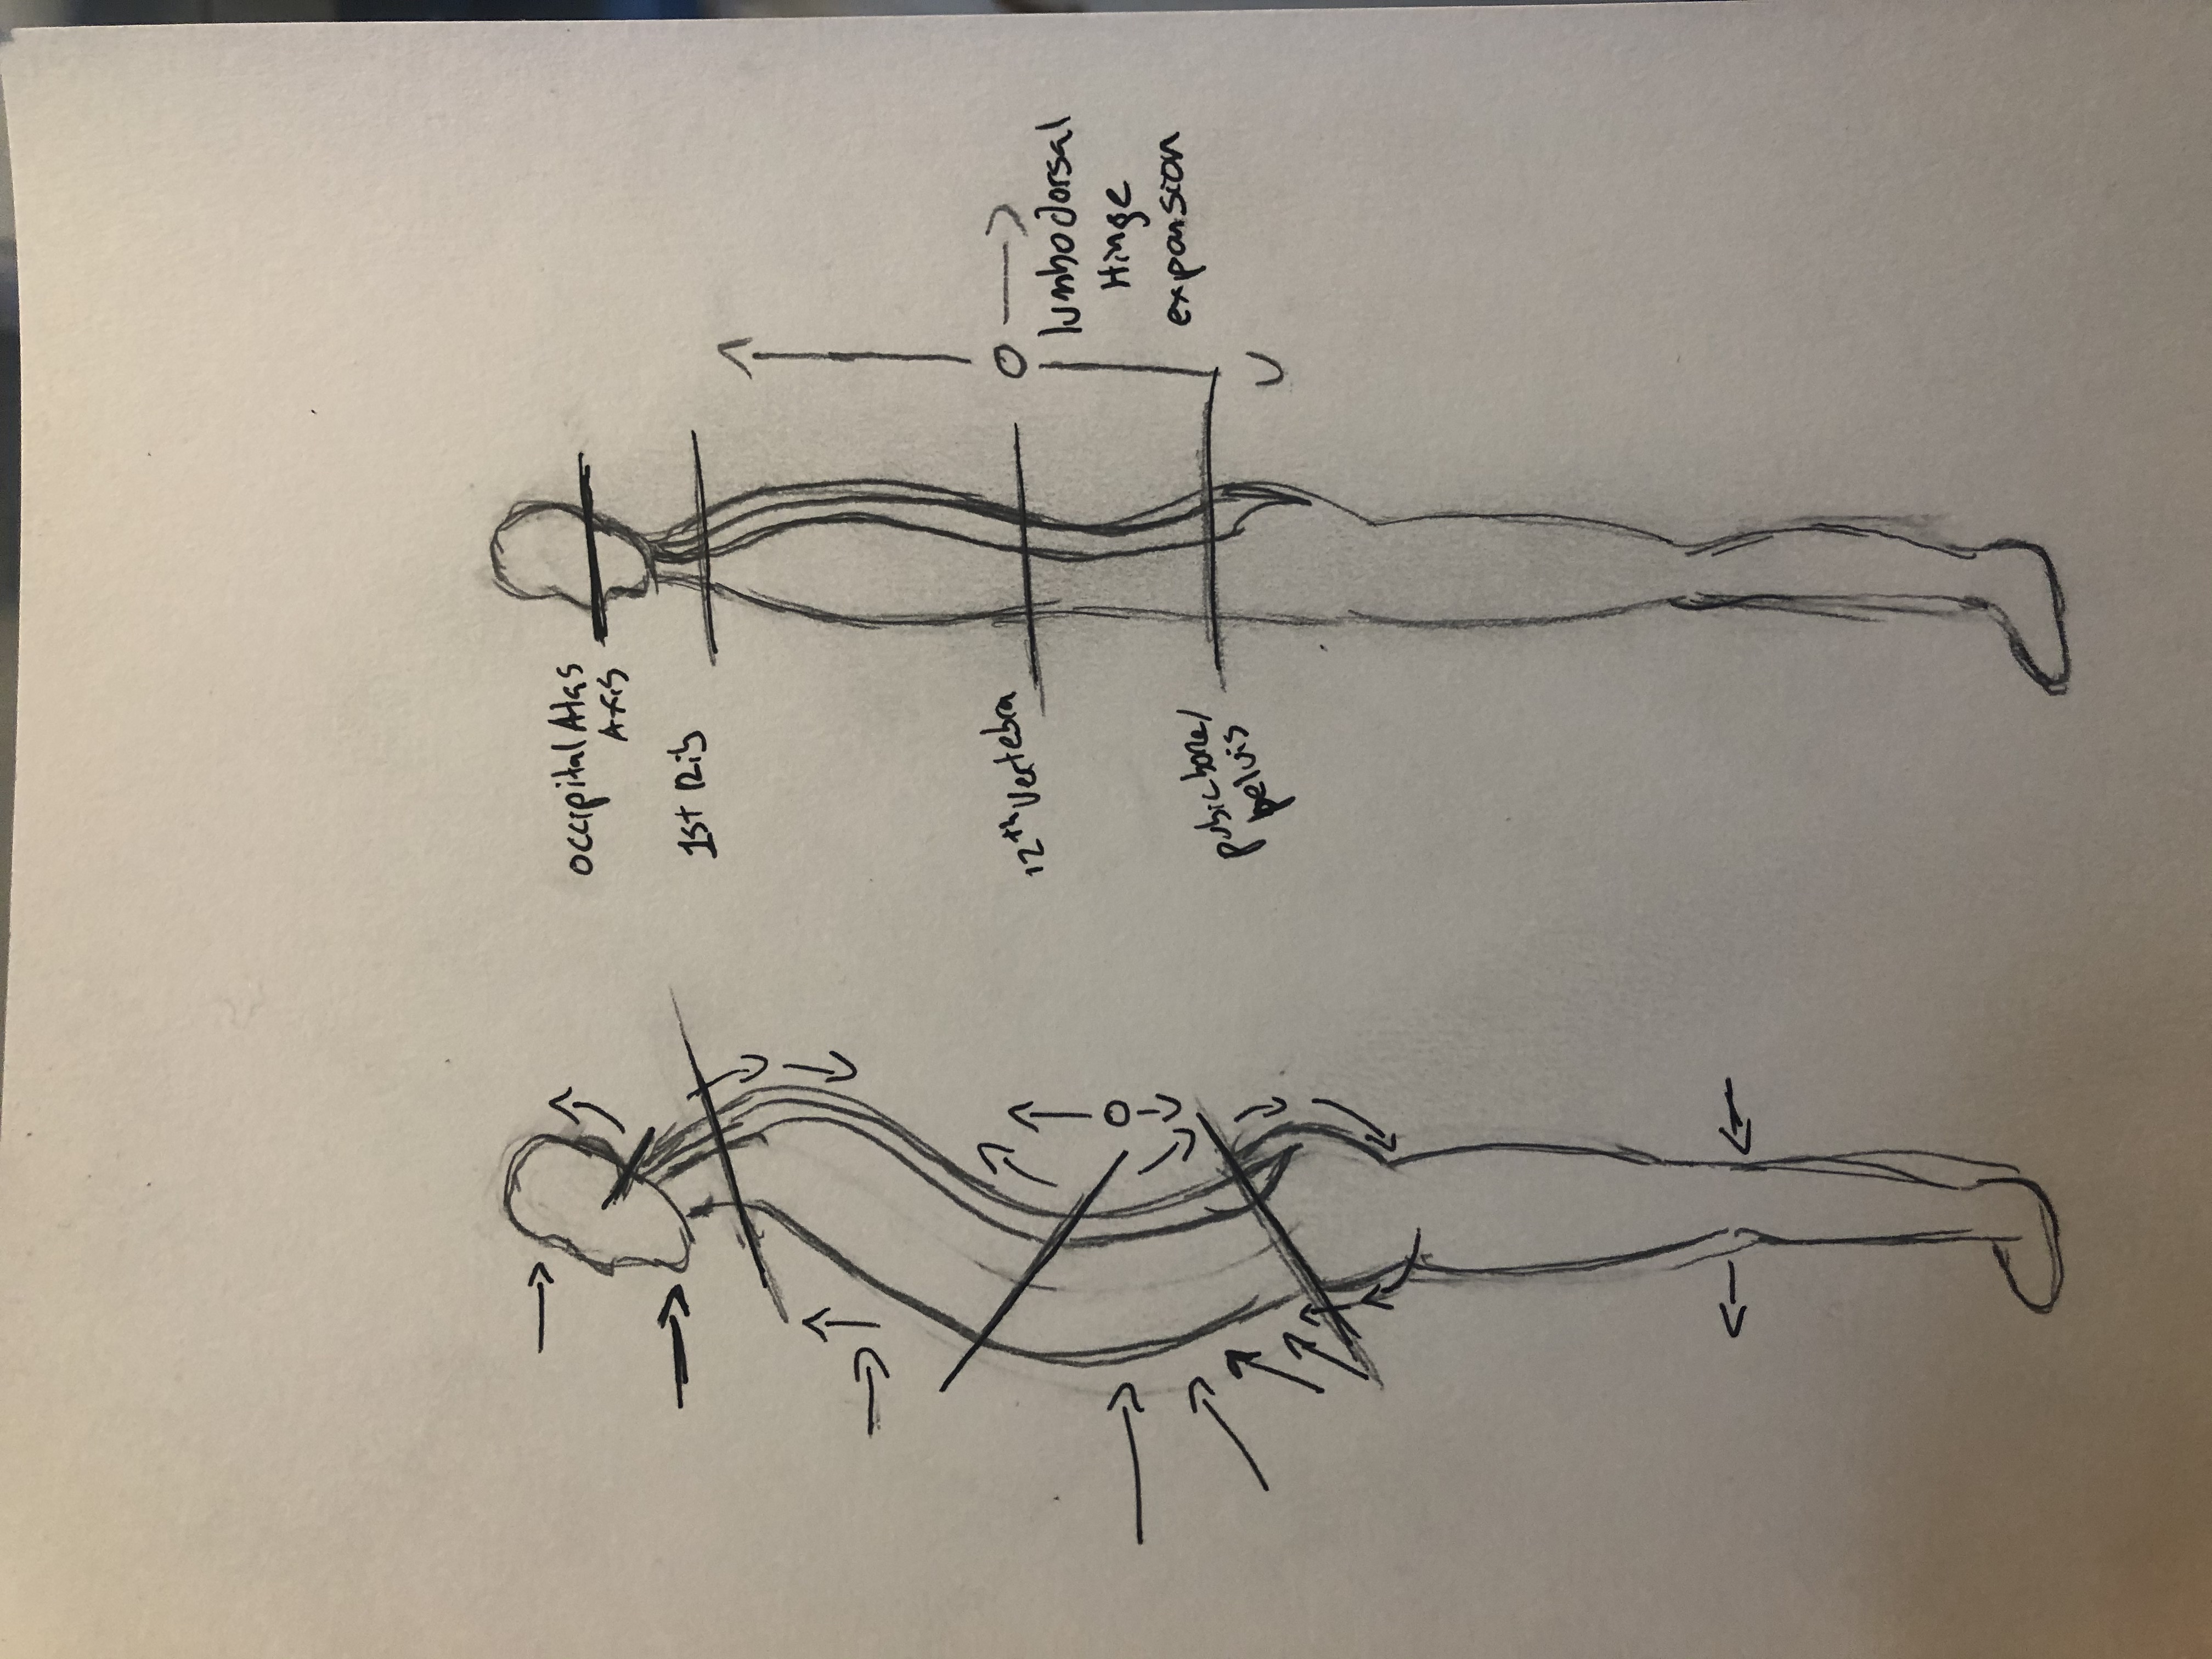
Picture the externally rotated leg columns continuing up through the thorax. Everything posterior gets pulled toward the midline; everything anterior gets pushed away from it.
The pelvis in this pattern is in an anterior tilt — imagine a bowl of water pouring forward out of your pelvis. This anterior tilt typically comes with an externally rotated and underactive psoas muscle, spread-out and weakened abdominals, and on the back side, a compressed sacrum with tight glutes.


.png)
Manual Release
Theracane Psoas Release
- 1Lie on your back with knees bent and feet flat on the floor.
- 2Use the pointed end of the Theracane to sink into the lower abdomen, slightly lateral to the navel — this is where you can access the psoas through the abdominal wall.
- 3Move from lateral to medial (because of the external rotation, the psoas needs to come toward the midline).
- 4Find spots that feel dense or tender, make contact, hold until you feel some release, then move to the next spot.
Lacrosse Ball Theracane Glute Release
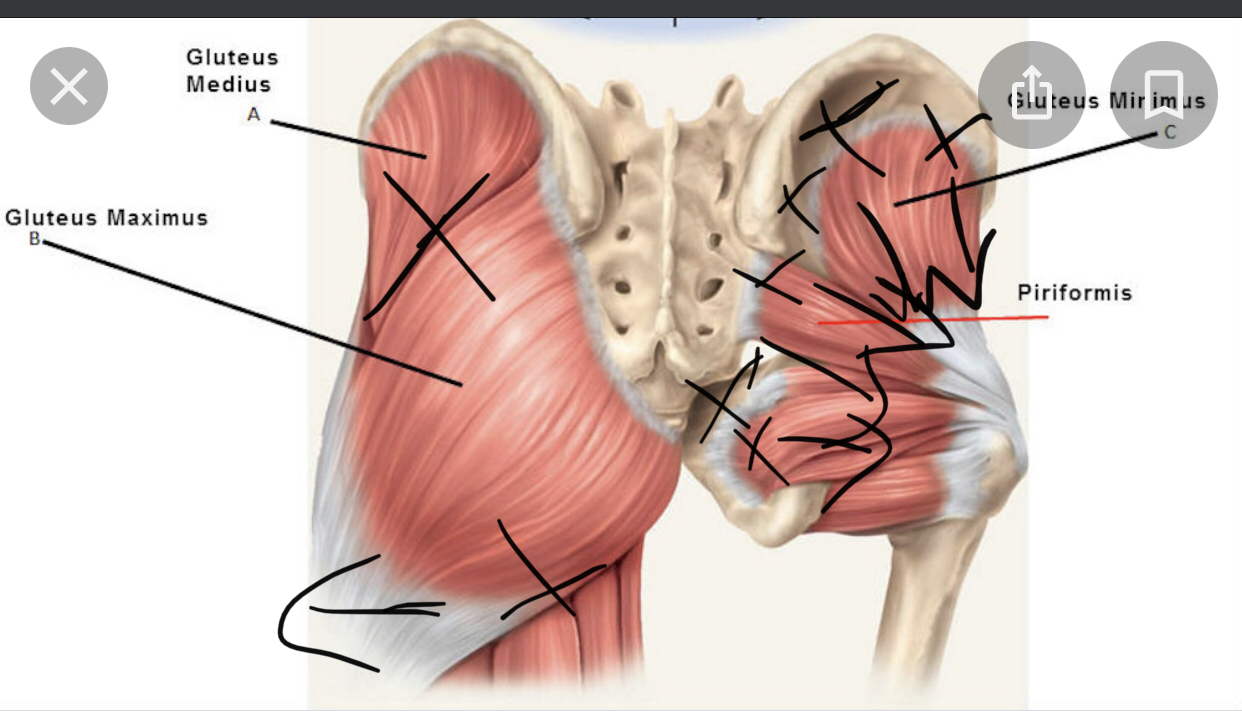
This is the single most impactful release technique for most people. Glute tension connects through fascial sheaths into the low back, so releasing the glutes often resolves low back pain directly.
- 1Lie on your back with knees bent, feet flat on the floor. Place the lacrosse ball under one side of your glutes. Start high on the lateral hip, rotating your body slightly to that side to sink your weight into the ball.
- 2Work through the muscle belly, finding the most tender spots. Sink in fully and breathe.
- 3Move toward the edge of the sacrum. Push into the glute max attachment, right at the border of the sacrum.
- 4Once you feel release at the sacrum attachment, begin thinking about length — slowly drawing the tissue laterally (away from the sacrum), lengthening the glute max fibers.
Lacrosse Ball Deep Six Release
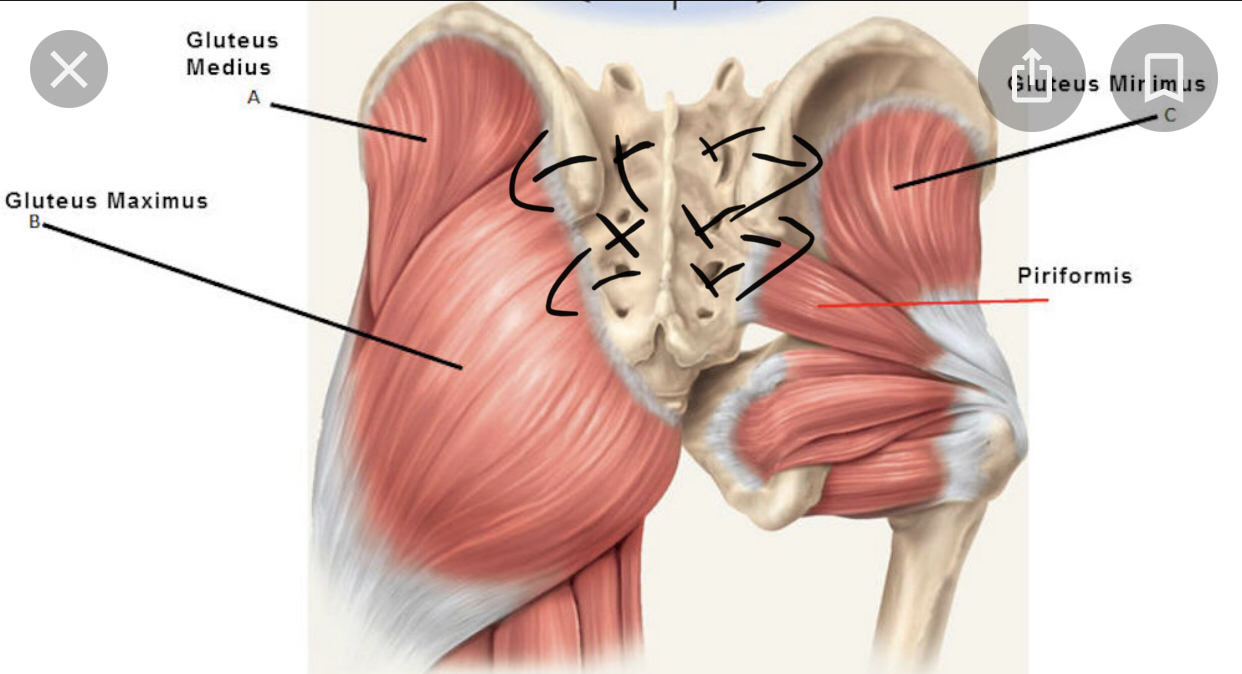
Beneath Gluteus Maximus and Minimus are six small external rotator muscles (the "deep six") — bands running essentially horizontally from the sacrum to the top of the femur. Releasing these is key to countering the external leg rotation pattern.
- 1Starting with the ball near the sacrum edge, rotate your body to bring the ball from medial to lateral — sweeping toward the top of the femur.
- 2As you reach the femur edge, you'll feel the muscles squeezing and lengthening over the bone. Hold here with the tension pulling lateral.
- 3Lift up and reset the ball slightly superior or inferior. Repeat, always sweeping from medial to lateral — never pushing the tissue back inward.
- 4Eventually you'll feel a crunchy or snapping sensation as tendons release and expand. This is a sign of meaningful release.
Percussion Device Abdomen
Use a percussion device over the entire abdomen in a clockwise direction (following the path of the large intestine) to stimulate digestion, circulation, and superficial fascial mobility.
Low Back
The quadratus lumborum (QL) attaches from the bottom of the ribs to the top of the pelvis, bridging the low back. The thoracolumbar fascia — a dense fibrous sheet — and the base of the erector muscles also attach at the pelvis. For most cases of low back pain, start by releasing the glutes thoroughly, then move to the low back.


.png)
.png)
.png)
.png)
.png)
.png)
.png)
.png)
Manual Release
Lacrosse Ball SI Joint Release
- 1Lie on your back with knees bent and feet flat. Place the lacrosse ball underneath your low back, just above the SI joint (sacroiliac joint) and lateral to the spine.
- 2Lift the same-side leg and bring the knee toward your chest, flexing the hip. Use the same-side arm to stabilize the knee, directing weight into the ball beneath you.
- 3Relax the low back into the ball and breathe — allow the pelvis to rock gently into a slight anterior tilt.
- 4Once you have depth, alternate between tensing the low back slightly (posterior tilt) and releasing into anterior — working the pelvis gently through its range while the ball provides sustained pressure.
- 5Adjust the knee and leg angle to explore different pressure angles on the low back.
Theracane QL / Low Back Release
- 1In the same position (lying on back, knees up), lift your body slightly and place the rounded hook of the Theracane beneath you, lateral to the spine above the SI joint.
- 2Lower your body weight onto the cane. Use the handle leverage to pull the tissue away from the midline — lateral and slightly inferior (toward the heels).
- 3The Theracane also allows you to reach the opposite side by extending the hook further beneath you.
The low back is compressed from the anterior pelvic tilt. Adding a posterior pelvic tilt while pressing the tissue inferior — toward the heels — helps counteract this compression and decompress the lumbar spine.
Mid Back — Lumbodorsal Hinge
Just above the most concave point of the low back's inward curve (the lumbar lordosis) there is a region of compression. This is the Lumbodorsal Hinge (LDH). The exact location varies by person but is most commonly around T12 — approximately level with the bottom of the rib cage.
The LDH is the starting point for Qi Gong breathing and bodywave practices. Manual release of this area tends to create a cascade of relief through the entire back and hips.


Manual Release
Theracane Erector Release at LDH
The erector muscles run in three parallel columns alongside the entire spine. In the LDH area, they tend to be strongly contracted toward the midline with dense fascial build-up.
- 1Lying on your back with knees bent, locate the bottom of your rib cage. Move the Theracane about 2 inches below this point.
- 2Position the hook side directly next to the spine. Lower your body weight onto the cane.
- 3Use the handles to pull the cane away from the midline — taking the erector tissue laterally.
- 4Move the cane an inch lateral to land in the middle of the erector chain and repeat the lateral traction.
Upper Back
Modern life calls for sustained hunching — driving, typing, texting, reading. The upper spine's natural outward curve is called the kyphotic arch. Chronic hunching increases this curve, shortening and weakening the upper back muscles. The corrective direction is to take these muscles back down and posterior — toward the heels and away from the hunch.


.png)
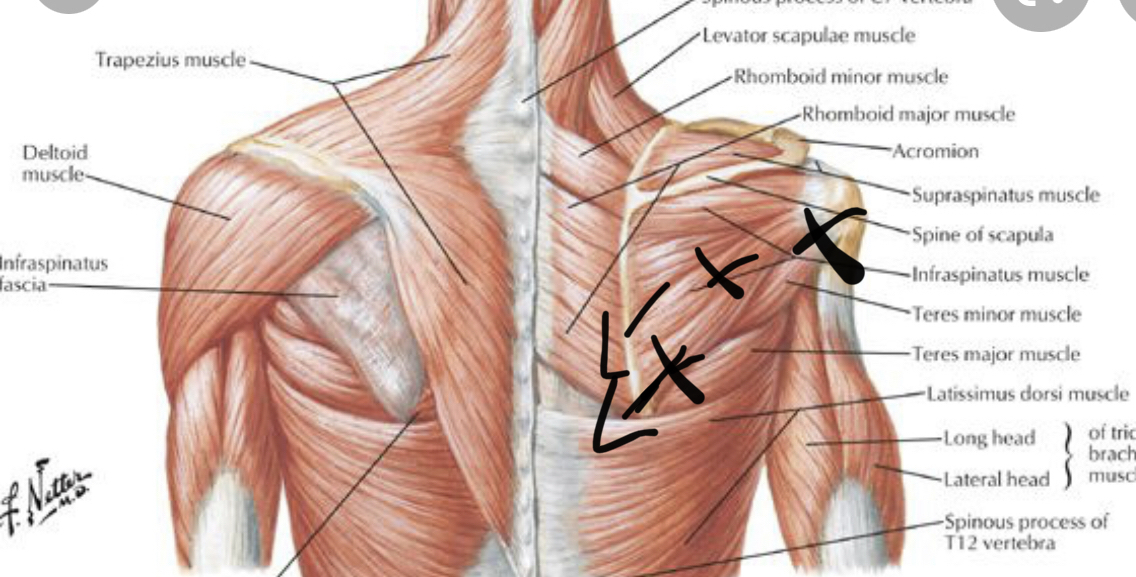
Four Key Release Points
These four locations drive the most upper back pain and dysfunction:
Theracane Lower Rhomboid
The lower rhomboid frequently develops a NeuroMuscular Trigger Point (NMT) that refers pain down the arms, up and down the back, and into the head.
- 1Against a wall or on the floor with the Theracane, locate the inferior angle (bottom tip) of the scapula with the hook end of the cane.
- 2Move 1–2 inches medially (toward the spine) from that point — this places you on the lower rhomboid.
- 3Explore until you find a particularly dense or tender spot. If you feel pain referring to distant areas, you've located an active NMT.
- 4Anchor with the wall or floor and sink in slowly, taking the tissue slightly inferior. Hold until release occurs.
Theracane Levator Scapulae
The levator scapulae is likely the most common "knot" people are aware of in their body. Hunching lifts the shoulders toward the ears, and the levator is a primary driver of this motion.
- 1Hook the Theracane over one shoulder. Locate where the levator attaches to the scapula — the superior medial corner (top-inner edge of the shoulder blade).
- 2Move 2 inches superior (toward the ear) from this point.
- 3Sink in and direct the tissue posteriorly and laterally — away from the neck, toward the back of the shoulder.
Theracane Lower Trapezius
The lower trapezius is often overstretched and underactivated with hunching. Target the lower fibers running diagonally from the mid-thoracic spine toward the scapula, taking tissue inferior and lateral.
Theracane Erectors at C7/T1
At the junction of the neck and upper back (C7/T1 — the prominent vertebra at the base of the neck), the erectors tend to compact and compress. Use the Theracane to sink into tissue just lateral to this junction and take it inferiorly.
Rib Cage & Sides
The bottom of the anterior (front) rib cage generally lines up with the LDH on the back. As a consequence of LDH compression and external rotation of the erectors, the front ribs tend to flare open. Addressing rib flare improves breathing, core stability, and thoracic mobility.
Treatment
Rib Flare Correction
- 1With open palms, contact both sides of the opposite rib cage.
- 2Gently draw the ribs closer together as you breathe into the mid-back.
- 3Combine with chin tuck and a subtle posterior pelvic tilt to create space through the mid-back.
Fingers Rectus Sheath / Side Body Expansion
The rectus sheath is a large fascial area on the front of the abdomen connecting the sternum to the pelvis. Just inferior and lateral to the nipples, this sheath tends to be pulled toward the midline.
- 1With your fingers, contact the opposite side of the rib cage at this area.
- 2Sink in gently and draw the tissue superiorly and laterally — toward the opposite armpit.
Fingers Serratus Anterior
The serratus anterior runs diagonally along the sides of the rib cage (you can see it as the finger-like muscles along the side of the ribs in athletic individuals). Take this tissue inferiorly to create more space through the side body.
Fingers Rib Separation
- 1Find spots along the sides of the rib cage where there is very little space between the ribs.
- 2Take a deep breath.
- 3As you inhale, use a few fingers to slowly sink between the ribs, encouraging them to separate.